You know how to create, run and evaluate models in Abaqus CAE: But wouldn’t it be nice to have an Abaqus model that does not have to be build again (including hundreds of clicks and dozens of swear-words) when some parameters have to be changed? Including solving and evaluating the model? Here, you will learn how to do that. On the way, we will discuss how to set up models on paper because a good plan and a structured approach is at least as important as being able to automize the model setup and evaluation.
You should already be familiar with the Abaqus CAE interface. If not, you can find some introductory Abaqus CAE videos here. You should also know the syntax of the scripting language Python which you can learn with SoloLearn or a huge number of other online resources. Everything we do in this course can be done with the Abaqus Student Edition, which is freely available to students but is limited to running models with up to 1000 nodes. For using Python, I recommend getting Anaconda, which is a Python installation that comes with the most important Python modules and Jupyter Notebooks, which I recommend using when you start with Python.
Scripting Abaqus
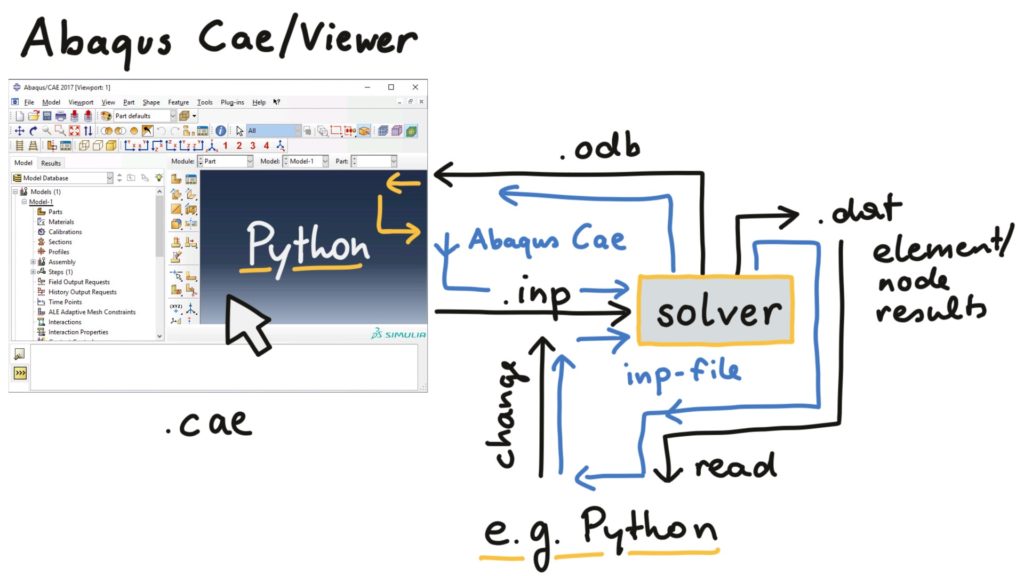
Abaqus consists of the Computer-Aided Engineering (CAE) and the Viewer interface (for setting up models and visualizing Output Database (odb) files) and the solver. The Viewer can be opened separately but is also included in CAE. The model is sent to the solver in plain-text formatted input (inp) files that contain the full model definition with all the nodes, elements, boundaries, loads, etc. In the 90s, you would have written those input files by hand. Today, you would rather use Abaqus CAE or other software to build your model and get the inp file. That gives us two basic options for automizing the model generation and evaluation:
- inp file: Manipulating an existing input file and reading results from the results file using a programming language. This is fast but limited to simple changes of material or loads but not changes in geometry (because the geometry would have to be re-meshed)
- Abaqus CAE: Using Abaqus-specific Python commands to automize everything that can be done in the CAE and viewer interface. Anything goes, but you have to deal with the way this is implemented in Abaqus CAE, which can be
horrible– I mean tricky at times.
In this course, we will mainly deal with the second option: Scripting Abaqus CAE using Python.
Exercises
- Set up Abaqus: Install the Abaqus student version, or get access to a computer with Abaqus installed.
- Set up Anaconda: Download and install it. We will need that at the end for creating diagrams in Python.
- If you are not already familiar with the Python syntax, learn that online using SoloLearn or something similar. If you do not know much about Abaqus CAE, learn how to use the program with youtube videos like those.
Further chapters
In chapter 2, we will look into all the steps to take before we start creating the actual finite element model. This will include thinking about a precise question, conducting tests, thinking of a key mechanism and investigating this mechanism using analytical and finite element models.
In chapter 3, we will look at how scripting the Abaqus CAE interface with Python works and what you need to understand before you can build your scripted models. A big part of that chapter will deal with selecting things like edges in Abaqus because this is the most complicated part of scripting Abaqus CAE models.
Chapter 4 will deal with evaluating Abaqus models in Abaqus CAE or the Abaqus Viewer to automatically generate png images and text files that contain the result data we are interested in.
All tools from chapter 3 and 4 will be applied to the example model in chapter 5, creating a Python script that completely builds, runs and evaluates a model from a set of geometry, material and load parameters.
Finally, chapter 6 will give some advice on keeping order with all the automatically created models, which means deleting unwanted result files and creating a folder structure for the job files and result files. A small introduction into plotting diagrams using Python (the matplotlib module) is also given.